|
Bulb Horn Tips
How to make your bulb horn last longerand even adjust the tone. Want to mount rubber bulb to your horn? See Bulb Mounting Tips 1. How to Generate a Loud Honk Squeeze rubber bulb quickly and firmly. The horn should generate a loud blast. If you squeeze rubber bulb gently, the horn will make no sound at all. 2. Shiny Brass or Patina? Even after a year or two, none of the brass horn in our shop has ever developed a tarnish. However, brass will tarnish over time. So if you like the antique look, then do nothing and your brass horn will eventually acquire a nice green patina. But if you prefer a shiny look, then any commercial brass polish will remove tarnish. And if you want to hasten the patina, then an initial application of brass polish (which is an abrasive) will remove the protective coating and accelerate the tarnishing process. 3. Bulb Care and Cleaning Some rubber bulbs seem to deteriorate at the outset, while others remain soft and pliable for many years. The primary cause of deterioration is ultraviolet radiation (sunlight), ozone, and oxidation (air). How to Extend the Life of Your Rubber Bulb 1. Limit exposure to sunlight, ozone and oxidation. 2. Store in a cool dark place free from humidity, temperature fluctuations, and ozone generators such as large electric motors. 3. Periodically apply commercial rubber protectant. Do not apply solvents, water-based cleaning solutions, or chemicals to rubber bulb. 4. Periodically honk your horn. Yes, you can extend the life of the bulb by simply honking the horn. That's because squeezing the bulb flexes the rubber which triggers infused "sacrificial" stabilizing wax that protect against degrading effects of ozone leading to dry rot.
Below are some resources that give you more technical and detailed rubber care information.
Causes of Dry Rot in Rubber Care of Objects Made from Rubber and Plastic Imperial Rubber Products Inc What can we do to make our rollers last longer? Rubber Oxidation "Bloom" 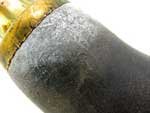 Bloom is a white residue that sometimes forms on rubber. Our bulbs are infused with a "sacrificial" stabilizing wax that protects rubber against the degrading effects of ozone leading to dry rot. Incidentally, you can protect the bulb from dry rot by simply honking the horn. That's because squeezing the bulb flexes the rubber which triggers the stabilizing additives. Bloom indicates the wax is working. Surface bloom can be removed using detergent, olive oil, or a commercial rubber protectant.
No two bulb horns sound alike. Each horn generates a tone different from the next. Several factors affect tone. These include tube length, bell shape, and reed. This instrument was pre-tested and produces a loud blast. But tone quality is subjective. You might love the tone of your horn. Or hate it. Not Happy with the Tone? Do not despair! Just change the reed. No two reeds are exactly the same. So a replacement reed will produce a different tone. Aside from changing the reed, there is little you can do to modify the tone of a bulb horn. How to Replace Reed in 5 Easy Steps  1. Remove Rubber Bulb:
Twist counter-clockwise.
1. Remove Rubber Bulb:
Twist counter-clockwise.
2. Remove Old Reed: Grasp reed base with pliers, twist counter-clockwise. 3. Install New Reed: Insert spare replacement tapered reed fitting into horn tube threaded socket. Twist clockwise until thumb tight. Tighten if necessary with pliers. 4. Re-attach Rubber Bulb: Turn clockwise until thumb tight. 5. Test Bulb Horn: Squeeze rubber bulb quickly and firmly. Horn should generate loud blast. Changed Reed But Still Not Happy with the Tone? More than likely the tone is either too squeaky, or too wheezy. 5. How to Adjust Horn Tone Technically speaking, you cannot adjust the tone of a bulb horn. That's because the reed pitch is fixed. So the most practical way to "adjust" the tone is change one reed for another. However, if you are handy with tools, then you can indeed change the tone. How? Modify the reed gap Squeaky tone? Then increase reed gap. Wheezy tone? Then reduce reed gap. Too Squeaky 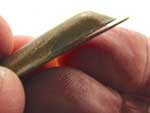 If the tone is too squeaky, then try increasing the reed gap. That's the space between the reed "tongue" and domed cover. Widening the gap provides more space for the tongue to vibrate. We recommend around 1/16" (1.6 mm)
or less. (pictured right)
If the tone is too squeaky, then try increasing the reed gap. That's the space between the reed "tongue" and domed cover. Widening the gap provides more space for the tongue to vibrate. We recommend around 1/16" (1.6 mm)
or less. (pictured right)
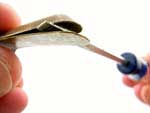
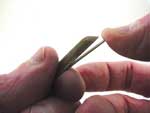 Here's a quick and simple way to increase the gap: Bend reed tongue open ever so slightly with a flick of your thumb as shown left.
 WARNING:
The "thumb flick" method is quick, but over bending can easily ruin the reed. So be careful not to bend the tongue open too far. You cannot unbend the tongue.
 Tone still squeaky? Then pry gap open a tiny bit more. But be careful. If gap is too wide, then horn will make no sound at all. Whoops! Did you pry the reed open too far? Is the reed ruined? You might still be able to save it. The tip below explains how.
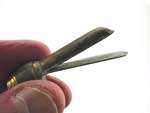
If the tone is wheezy, then try reducing the reed gap. That's the space between the reed "tongue" and domed cover. There is no good way to do this. But you might be able to reduce the gap by crunching the tongue down using a pliers. How to reduce gap: 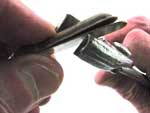 Position pliers on the reed and squeeze. The reed might end up a bit mangled and is probably ruined. But if you are lucky, the horn will blast again. (If you find a better way to reduce the gap, please let us know so we can pass the tip along to other customers. Note: Applying tape or glue does not work because it prevents the reed from vibrating.)
Questions? Give us a holler. |